0

Easter free patterns

pascoa

Please, do not sell this pattern. It was made by me and I want it free…always!
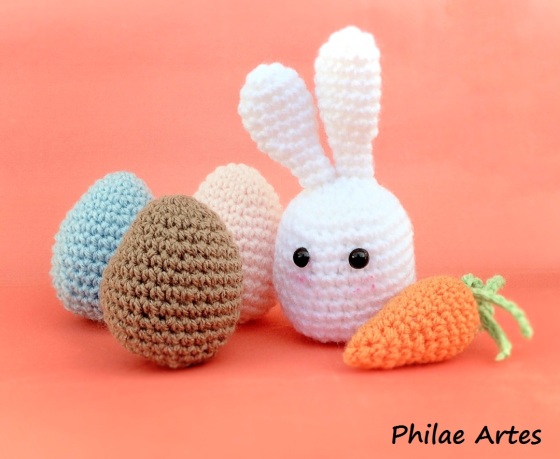
Are you ready for Easter?

Materials that you will use:
– yarns;
– acrylic fiber (to stuff);
– a pair of black safety eyes (5mm);
– crochet hook (3.0mm);
– tapestry needle.

BUNNY

Head
White yarn.
Rnd 1: 6 sc in magic circle (6)
Rnd 2: inc x6 (12)
Rnd 3: *sc in next sc, inc* x6 (18)
Rnd 4: *sc in next 2 sc, inc* x6 (24)
Rnd 5: *sc in next 3 sc, inc* x6 (30)
Rnd 6-13: sc in each sc (30)
Rnd 14: *sc in next 3 sc, dec* x6  (24)
Put the safety eyes.
Rnd 15: *sc in next 2 sc, dec* x6 (18)
Rnd 16: sc in each sc (18)
Stuff.
Rnd 17: *sc in next sc, dec* x6 (12)
Rnd 18: dec x6 (6)
Finish off, hide the tail.

Ears
White yarn.
Rnd 1: 6 sc in magic circle (6)
Rnd 2: inc x6 (12)
Rnd 3-5: sc in each sc (12)
Rnd 6: *sc in next 4 sc, dec* x2 (10)
Rnd 7: *sc in next 3 sc, dec* x2 (8)
Rnd 8: *sc in next 2 sc, dec* x2 (6)
Rnd 9-11: sc in each sc (6)
Finish off and leave a long tail to sew it later to the head.

CARROT
Orange yarn.
Rnd 1: 6 sc in magic circle (6)
Rnd 2: inc x6 (12)
Rnd 3: *sc in next sc, inc* x6 (18)
Rnd 4-6: sc in each sc (18)
Rnd 7: *sc in next 7 sc, dec* x2 (16)
Rnd 8: *sc in next 6 sc, dec* x2 (14)
Rnd 9: *sc in next 5 sc, dec* x2 (12)
Rnd 10: sc in each sc (12)
Rnd 11: *sc in next 4 sc, dec* x2 (10)
Rnd 12: *sc in next 3 sc, dec* x2 (8)
Stuff.
Rnd 13: *sc in next 2 sc, dec* x2 (6)
Rnd 14: *sc in next sc, dec* x2 (4)
Finish off, hide the tail.
To make the leaves: use the green yarn, chain 8 and attach it to the carrot using the tapestry needle. I made 5 of them.

EGGS
Rnd 1: 6 sc in magic circle (6)
Rnd 2: inc x6 (12)
Rnd 3: *sc in next sc, inc* x6 (18)
Rnd 4: sc in each sc (18)
Rnd 5: *sc in next 2 sc, inc* x6 (24)
Rnd 6: sc in each sc (24)
Rnd 7: *sc in next 3 sc, inc* x6 (30)
Rnd 8-11: sc in each sc (30)
Rnd 12: *sc in next 13 sc, dec* x2 (28)
Rnd 13: *sc in next 12 sc, dec* x2 (26)
Rnd 14: *sc in next 11 sc, dec* x2 (24)
Rnd 15: *sc in next 2 sc, dec* x6 (18)
Stuff.
Rnd 16: *sc in next sc, dec* x6 (12)
Rnd 17: dec x6 (6)
Finish off, hide the tail.

14

Mini Minion

minion1
MINI MINION
(from the movie “Despicable me”)
To use everywhere! Car, Keychain, backpack!
Please, do not sell this pattern, sell only the amigurumi 🙂

Yarn colors you are going to use:
– yellow
– black
– blue
– gray

Felt colors you are going to use:
– white
– brown

HEAD/BODY
Yellow yarn.
Rnd 1: 6 in magic circle (6)
Rnd 2: inc x6 (12)
Rnd 3-6: sc in each sc (12)
Change to blue yarn.
Rnd 7-9: sc in each sc (12)
Rnd 8: dec x6 (6)
Finish off.

ARMS x2
Black yarn.
Rnd 1: 5 in magic circle (5)
Change to yellow yarn.
Rnd 2-3: sc in each sc (5)
Finish off leaving a long tail to sew it later on the body.

LEGS X2
Black yarn.
Rnd 1: 5 in magic circle (5)
Change to blue yarn.
Rnd 2: sc in each sc (5)
Finish off leaving a long tail to sew it later on the body.

STRAPS
For clothing (x2): Chain 8 using blue yarn.
For the eye (x1): Chain 14 using Black yarn.
Finish off leaving a long tail to sew it later on the body.

Put it all together.
Then cut on the white felt the eye, and then the circle on the brown felt (I made a black dot using a pen for fabric). Using a piece of gray yarn, make a circle surrounding the eye and use glue to attach.

minion2

7

Mini Master Yoda Amigurumi from Star Wars

yoda1
Mini Yoda from Star Wars!

If you want a bigger Yoda, click here.

Please, do not sell this pattern (you can sell the amigurumi).

Yarn colors that you will use:
– Green yarn
– Cream color yarn.

Felt colors that you will use:
– Brown felt

HEAD
Green yarn.
Rnd 1: 6 sc in magic circle (6)
Rnd 2: inc x6 (12)
Rnd 3: *sc in next sc, inc* x6 (18)
Rnd 4: *sc in next 2 sc, inc* x6 (24)
Rnd 5-7: sc in each sc (24)
Put the safety eyes (I put them later with glue, because it was not the amigurumi normal eyes, just little balls).
Rnd 8: *sc in next 2 sc, dec* x6 (18)
Rnd 9: *sc in next sc, dec* x6 (12)
Stuff.
Rnd 10: dec x6 (6)
Finish off and leave a long tail for sewing it later on the body.

BODY
Cream color yarn.
Rnd 1: 6 sc in magic circle (6)
Rnd 2: inc x6 (12)
Rnd 3-4: sc in each sc (12)
Rnd 5: *sc in next sc, inc* x6 (18)
Rnd 6: sc in each sc (18)
Rnd 7: *sc in next sc, dec* x6 (12)
Stuff.
Rnd 8: dec x6 (6)

ARMS x2
Green yarn.
Rnd 1: 6 sc in magic circle (6)
Change to cream color yarn.
Rnd 2-3: sc in each sc (6)
Finish off and leave a long tail for sewing it later on the body.

FEET x2
Green yarn.
Rnd 1: 4 sc in magic circle (4)
Finish off with a slip st and leave a long tail for sewing it later on the body.

EARS X2
Green yarn.
Chain 5.
Single crochet on the second chain from hook for the next 4 st.
Finish off and leave a long tail for sewing it later on the head.

HOOD
Cream color yarn.
Rnd 1: 6 sc in magic circle (6)
Rnd 2: sc in each sc (6)
Rnd 3: inc x6 (12)

DETAIL OF THE CLOTHING
Cut on the brown felt (I used fabric) a triangle and use glue to attach to the body:
Then chain 20 on cream color yarn and use glue to attach to the brown felt, passing through his neck.

A cute Master Yoda you will have!

4

Saint Francis of Assisi

francis7
Saint Francis of Assisi – By Philae Artes
Please, do not sell this pattern (I hope you sell the amigurumi). It was made by me and I want it free…always!
I’m sorry about my english. I’m from Brazil.

Yarn colors that you will use:
– brown 1 (lighter)
– brown 2
– light brown (skin)
– white
– white felt

Make the pieces in order.

HEAD
Light brown yarn.
Rnd 1: 6 sc in magic circle (6)
Rnd 2: inc x6 (12)
Rnd 3: *sc in next sc, inc* x6 (18)
Rnd 4: *sc in next 2 sc, inc* x6 (24)
Rnd 5-7: sc in each sc (24)
Put the safety eyes (I put them later with glue, because it was not the amigurumi normal eyes, just little balls).
Rnd 8: *sc in next 2 sc, dec* x6 (18)
Rnd 9: *sc in next sc, dec* x6 (12)
Stuff.
Rnd 10: dec x6 (6)

ARMS x2
Light brown yarn (skin).
Rnd 1: 6 sc in magic circle (6)
Change to brown yarn.
Rnd 2-7: sc in each sc (6)

FEET X2
Light brown yarn (skin).
Rnd 1: 6 sc in magic circle (6) and finish off.

BODY
Brown  1 (lighter) yarn.
Rnd 1: 6 sc in magic circle (6)
Rnd 2: inc x6 (12)
Rnd 3: sc in each sc (12)
Rnd 4: *sc in next sc, inc* x6 (18)
Rnd 5-7: sc in each sc (18)
Rnd 8: *sc in next 2 sc, inc* x6 (24)
Rnd 9-15: sc in each sc (24)
Stuff. You are not going to finish it. You will need a “cover” to close it, so:

“COVER” OF THE BODY (near feet)
Brown  1 (lighter) yarn.
Rnd 1: 6 sc in magic circle (6)
Rnd 2: inc x6 (12)
Rnd 3: *sc in next sc, inc* x6 (18)
Rnd 4: *sc in next 2 sc, inc* x6 (24), finish off leaving a long tail to sew.

You may have:
francis1
Now sew the feet to the body, and the sew the cover to finish, like this:
francis3

Sew the head and arms to the body.

CLOAK
Brown  1 (lighter) yarn.
Chain 24 stitches and turn, using sc keep doing it for more 5 rows, like this:

francis5

Then, sew to the body, closing it on his back, like this:

francis6

BELT
White yarn.
Chain 40.

HAIR/BEARD
Brown 2 yarn.
Use a long thread and keep sewing, like this:
francis4

BIRD:
Cut it on white felt, draw an eye with a pen and glue on his hand.

francis10

My mom loves Francis!

francis8

1

Little Owl

Hi guys! If you want a pattern, please ask me 🙂

coruja1coruja4

LITTLE OWL

Colors you will need:
– purple yarn
– white yarn
– pink yarn
– yellow felt

EYES
White yarn
Rnd 1: 6 sc in magic circle (6)
Rnd 2: inc x6 (12)

BODY AND HEAD

Pink yarn.
Rnd 1: 6 sc in magic circle (6)
Rnd 2: inc x6 (12)
Rnd 3: *sc in next sc, inc* x6 (18)
Rnd 4: *sc in next 2 sc, inc* x6 (24)
Rnd 5-6: sc in each sc (24)
Change to purple yarn.
Rnd 7-11: sc in each sc (24)
Stuff and sew and put the safety eyes.
Rnd 12: *sc in next 2 sc, dec* x6 (18)
Rnd 13: *sc in next sc, dec* x6 (12)
Finish off, stuff and sew in a line to form the “ears”.

WINGS (2x)
Purple yarn.
Rnd 1: 6 sc in magic circle (6)
Rnd 2: sc in each sc (6)
Rnd 3: inc x6 (12)
Rnd 4-5: sc in each sc (12)
Finish off, don’t stuff and sew in a line, then sew to the body.

Cut on yellow felt:
– beak

You can make keychain also:

coruja2


10

Princesa Jasmine – Princess Jasmine

jasmin2 jasmin3

Princess Jasmine – By Philae Artes

Please, do not sell this pattern. It was made by me and I want it free…always!

HEAD

Light brown yarn

Rnd 1: 6 sc in magic circle (6)

Rnd 2: inc x6 (12)

Rnd 3: *sc in next sc, inc* x6 (18)

Rnd 4: *sc in next 2 sc, inc* x6 (24)

Rnd 5: *sc in next 3 sc, inc* x6 (30)

Rnd 6-9: sc in each sc (30)

Rnd 10: *sc in next 3 sc, dec* x6  (24)

Put the safety eyes (I didn’t have one, then I made with yarn)

Rnd 11: *sc in next 2 sc, dec* x6 (18)

Rnd 12: *sc in next sc, dec* x6 (12)

Stuff.

Rnd 13: dec x6 (6)

BODY

Light brown yarn

Rnd 1: 6 sc in magic circle (6)

Rnd 2: sc in each sc (6)

Rnd 3: *sc in next sc, inc* x3 (9)

Rnd 4: sc in each sc (9)

Rnd 5: *sc in next sc, dec* x3 (6)

Rnd 6: sc in each sc (6)

Rnd 7: inc x6 (12)

Rnd 8: *sc in next 2 sc, inc* x4 (16)

Change to blue yarn

Rnd 9: sc in each sc (16)

ARMS x2

Light brown yarn

Rnd 1: 6 sc in magic circle (6)

Rnd 2-7: sc in each sc (6)

LEGS  x2

Blue yarn

Rnd 1: 8 sc in magic circle – don’t leave the hole too tight, ‘cause you are going to put the feet in there (8)

Rnd 2: sc in each sc (8)

Rnd 3: inc x8 (16)

Rnd 4-6: sc in each sc (16)

Rnd 7:  *sc in next 6 sc, dec* x2 (14)

Rnd 8: *sc in next 2 sc, dec* x2 (12)

Rnd 9:  *sc in next 2 sc, dec* x2 (10)

Rnd 10: *sc in next 2 sc, dec* x2 (8)

Rnd 11: sc in each sc (8)

FOOT x2

Yeallow yarn (or blue, if you prefer)

Rnd 1: 6 sc in magic circle (6)

Rnd 2-4: sc in each sc (6)

I didn’t stuff. You just have to fold it.

BRA

Blue yarn

Chain 15, then sc with your first chain, chain 19, then sc your last chain with the 4th chain after the first join, like this:

d1

Then working to the left chain 3 and sc, chain 3 and sc., like this:

d2

Now put pass through the arms and join the holes, like this:

jasmin4

EARRINGS x2

Yeallow yarn

Rnd 1: chain 5 and turn

Rnd 2: sc in the next 4 sc (4) turn

Rnd 3: sc in the next 2 sc (2) turn

Rnd 4: sc in the next sc (1)

TIARA

Chain 15 in blue yarn.

TIARA’S GEM

In a different blue color.

Rnd 1: 6 sc in magic circle (6)

Change to yellow.

Rnd 2: sc in each sc (6)

Sew on the tiara.

Then put all together, add the hair, make her hairstyle and add the tiara!